Finding flowers for your wedding - how to avoid a DIY disaster

Finding flowers for your wedding – how to avoid a DIY disaster

Even though it is still cold and it was snowing a few days ago, I can hear the birds chirping outside, store windows are touting warm weather frocks, and people are pinning bright springtime pins on Pinterest.

Suddenly I find myself loving peach again and other springtime colors.  And I have flowers on my mind.

Oh flowers.....

If you are planning your wedding, or have planned your wedding, you know how much agony these delicate buds of joy can wreak on you and your wallet (as in $1500-$3000 worth of agony).

When I got married, I planned to DIY all my flowers. Three months before I walked down the aisle, I realized I didn't have enough time to make the arrangements, I would have to store them at my venue the night before, and my venue wouldn't let me store them anyway because they'd have to run the AC all night just for my flowers. My lack of planning ahead resulted 1-2 nights of sobbing, and a lot of stressful days - all at a time when I wanted to stop worrying about stuff and start celebrating!

I am just taking a guess here…but I bet I'm not the first person out there who has stressed out about wedding flowers...and I'm certainly not the last.

So in an effort to help at least one person planning their wedding avoid a few days of freaking out, I’ve compiled a list of things I would’ve done differently if I had the chance… please chime in and leave a comment if you have any suggestions too!

1) I would've figured out how many flowers I need earlier on. Once I had my venue selected and I had a general idea of what kind of decorations I wanted, I should've written out a list of how many flower arrangements I needed (how many boutonnieres, bouquets, centerpieces, etc.). It would’ve been just a ballpark list, but it would've helped me  realize it's too much to do before my wedding and I probably would've looked into hiring a florist earlier on for some or all of my flowers!

2) Since I was planning to DIY my flowers, I should've come up with a plan as early as possible. If you are thinking about DIY-ing any of your wedding flowers – even if its just the bouquets – I urge you to figure out how much time you’ll need and come up with a plan as early as possible! Weddingbee's discussion boards are an excellent resource for advice on where to buy your flowers, success stories, and links to tutorials.

Here are some helpful tips that I remember from my research....

  • Practice in advance
  • Recruit a team of family and friends to help
  • Choose durable flowers
  • Allocate time to prep the flowers for the arrangements
  • Make sure you have a cool, dry place to store your flowers
  • Find someone with a truck or large van to be in charge of transporting the flowers
  • Make sure you have someone who can set up the flowers and deliver boutonnieres and boquets
  • Make sure your venue knows your plans and are ok with them
  • Make sure you have someone who can deliver and set up the arrangements, and your venue knows about your plans

3) Consider flower alternatives. You may realize that DIY-ing  your flowers is not a viable option. The good news is that you don't have to use flowers for everything - in fact, you could get away with not having a single flower in your whole wedding.

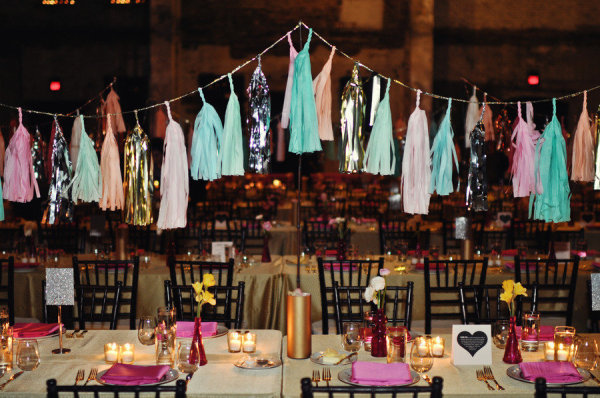
If you're on Pinterest, you've probably seen tutorials for how to make flower arrangements out of newspapertissue paper, and other forms of paper.  Recruit your bridesmaids months before your wedding and make centerpieces out of  tissue tassel garlands, or attach some strands of tissue paper and tinsel to sticks and stick them in some old bottles. The possibilities are endless and the best part is, you can do it all in advance.

tissue tassel garland centerpiece - stylemepretty

4) But don't give up on flowers if you really want them! I was lucky and found an amazing florist who was more affordable than going the wholesale flower route, and great to work with. And she grows all her own flowers! (Yes, I know I was really lucky!) But maybe you will be too if you do a little research! I suggest looking on the Association of Specialty Cut Flower Growers' website for a list of local florists and growers in your area.

Finding flowers for your wedding – how to avoid a DIY disaster

Bridesmaids photo taken by Elizabeth Messina, and featured on Ruffled. Tissue tassel garland centerpiece featured on StyleMePretty and photo taken by The Photography ShoppeFlower arrangements by Kate Sparks of Lilies and Lavender, and photo taken by Lauren Fair Photography.

Prime time DIY - scribble scrabble heart garland

With all the amazing Valentine's Day DIY tutorials I've been seeing online, I've been feeling pretty inspired to make something...but not inspired enough to go crazy and turn my living room wall into a fringe heart photobooth backdrop. More like inspired enough to make something that doesn't require me to buy anything new...and can be made during a night of watching mindless prime time TV. So this past week I grabbed a roll of parchment paper, a pair of scissors, some colored pencils, a sewing needle and string, and turned on the TV to watch the reality show disaster known as The Bachelor (my favorite show to hate-watch).

After two hours and a rose ceremony, here is what I came up with......

Valentines Day DIY - Scribble Scrabble Heart Garland

This garland is easy to make, scalable (can make a little one or a super long one), and you can decorate it any way you want! I used colored pencils and some gold glitter but you could use a regular pencil or Sharpie to draw dots or stripes, and it would look equally awesome.

Anyway if you want to make one here's what you do...

DIY heart garland step 1 - create a heart tracer

Using the "folded paper in half/draw half a heart" technique you learned in first grade, make a heart that is about 1.5"-2" wide and tall to use as your tracer. I used a piece of scrap paper to make mine but you can use parchment paper.

Step 2 - Scribble - paper heart garland DIY

Take a piece of parchment paper that's about 2 feet long and scribble all over half of your paper with colored pencil, Sharpie markers, crayons, or regular old pencil. Leave the other half of the paper blank.

Step 3 - Cut out your hearts - DIY paper heart garland

Trace your hearts and cut them out. I suggest cutting out 17-2o hearts (I used 17 for my garland). Half of the hearts I cut out were white and the other half were scribble scrabble hearts. That way I could alternate white and red hearts in my garland!

Step 4 - Sew hearts together - DIY Paper heart garland

Sew two hearts together at the top corners of the heart and make a double stitch and double knot your stitch before cutting the string. I made sure all my scribble hearts were sewn on top of the white ones for consistency.

Step 5 - Add strings to end - DIY paper heart garland

After you are done sewing all your hearts together, add 8-12 inches of string on each end (attach using same double stitch technique from Step 4). I added string so that my garland was longer and it gave me more flexibility with hanging it.

Step 6 - embellish your hearts - paper heart garland DIY

This last step is optional. I decided to add some sparkle to my heart. Using Mod Podge glue and superfine gold glitter, I painted some glue dots on the white hearts, painted some scribble lines on the red hearts, and sprinkled gold glitter on them. If you do add glitter with glue, make sure you sprinkle the glitter soon after you apply the glue before the glue dries!

There are a few nights left of good prime time TV to make paper heart garlands before Valentine's Day so if you decide to make one please share your photos!!! I'd love to see how they turn out! You can share them by posting to my Facebook page, by emailing your picture to SparkleMotionDecor@gmail.com, tweeting your photo to @SparkleMoDecor, or pinning your  photo with #SparkleMotionDecor in the caption.

I hope everyone has a wonderful Valentine's Day and is able to find some time to do something or spend time with someone you love!

It's all aboot the 'bout at the West Elm Chelsea Spring Social!

DIY air plant made @west elm in Chelsea (event hosted by @Michelle Edgemont) #wespringsocial

Yesterday evening I attended the  West Elm Spring Social hosted by wedding designer extraordinaire, Michelle Edgemeont, and made the cutest boutonnieres using tiny air plants and paper flowers sold at West Elm.

West Elm Paper Flower Shop #wespringsocial #westelm

These boutonnieres are really easy to make and a perfect DIY for  anyone getting married, going to the prom, or for those in need of some floral flair to spruce up an outfit. And if you're getting married you can make these several days before your wedding.

DIY air plant and paper flower boutonniere made at West Elm Spring Social in Chelsea #wespringsocial #westelm

Here's what you need to make these stylish boutonnieres....

And here's how you make them....

First you want to attach some floral wire to your air plant by sticking the wire through the base of the plant and twisting it (don't worry you won't hurt the plant).

  • After you do that you'll want to wrap floral tape around the wire. You can see photos of how to attach the wire and tape here. We only used one piece of wire but the example I've linked to uses 2

You then need to add the rest of your foliage and once you figure out your combination you just wrap more floral tape around it all and finish off with some ribbon (this last part is optional though!). And don't forget to trim the wire - the boutonniere's base only needs to be a few inches long.

  • I made one boutonniere with a smaller air plant, small white paper flowers, goldenrod, and eculyptus leaves, and a larger one with just a peach paper flower with brown paper leaf and an air plant

DIY air plant and paper flower boutonniere made at West Elm Spring Social in Chelsea #wespringsocial #westelm, hosted by Michelle Edgemont

If you are making these for your wedding I suggest you make a few test ones to see how long they last (so you know how far in advance you can make them) and  if you are using real live foliage in addition to your air plant/paper flowers, you should check the life span of said foliage since some are more durable than others.

air plant from West Elm in Chelsea

If anyone tries making one of these please share your pics!